In certain situations requiring enhanced performance, reliability, security, and manageability, you can isolate virtual machine (VM) live migration traffic on a dedicated network within Red Hat OpenShift Virtualization. You use a NodeNetworkConfigurationPolicy (NNCP) provided by the Nmstate Operator to create an Open vSwitch (OVS) bridge with a NetworkAttachmentDefinition (NAD) referencing that bridge. This configuration allows OpenShift Virtualization to utilize a separate physical network or VLAN for migration data. This article provides a step-by-step guide for this setup.
Create a NodeNetworkConfigurationPolicy (NNCP)
A NodeNetworkConfigurationPolicy (NNCP) refers to how you apply network configuration to your cluster nodes during day 2 operations. You can apply these settings in a simple YAML format or use the Red Hat OpenShift web console GUI to configure additional networks and bridges.
Follow these steps to create a NodeNetworkConfigurationPolicy (Figure 1):
In the OpenShift web console UI, navigate to Networking → NodeNetworkConfigurationPolicy.
Click Create → From Form and fill in the form as per your requirements.

Key points to note on this page include:
br-lmThis is the interface name of the bridge.- Type:
ovs-bridgeThis tells Nmstate to create an Open vSwitch (OVS) bridge. - OVN localnet name:
ovs-lmThis is the name of the localnet mapping to the OVS bridge. - OVN bridge name:
br-lmThis is the name of the OVS bridge specified inovs-bridge.
The following is the YAML definition of the NNCP:
apiVersion: nmstate.io/v1
kind: NodeNetworkConfigurationPolicy
metadata:
  annotations:
    description: Network configuration for enp4s0 on all nodes
  name: live-migration
spec:
  desiredState:
    interfaces:
      - bridge:
          allow-extra-patch-ports: true
          options:
            stp: false
          port:
            - name: enp4s0
            - name: br-lm
        name: br-lm
        state: up
        type: ovs-bridge
    ovn:
      bridge-mappings:
        - bridge: br-lm
          localnet: ovs-lm
          state: present
Create a NetworkAttachmentDefinition (NAD)
A NetworkAttachmentDefinition (NAD) directs Multus (and OVN-Kubernetes) to connect pods or virtual machines to a specific network. For instance, we will reference the local network mapping (ovs-lm) from the previously mentioned NNCP, and a VLAN, such as 3030, and create an NAD in the openshift-cnv namespace.
Follow these steps to create a NetworkAttachmentDefinition (Figure 2):
In the OpenShift web console UI, select Networking → NetworkAttachmentDefinition.
From the Project menu, select openshift-cnv. You might need to enable Show default projects to list all system projects.
Click Create NetworkAttachmentDefinition and fill out the form per your requirements.
Click Create.

Key points to note on this page include:
- Project
openshift-cnv: This is the project or namespace in which the NAD will be created. nad-live-migrate: This is the name of the NAD that OpenShift Virtualization will use as the live migration network.- Network type
OVN Kubernetes secondary localnet network: We have to select this since we created a localnet using NNCP. - Bridge mapping
ovs-lm: This is the same name provided in the NNCP for OVN localnet name. - VLAN
3030: Please give the appropriate VLAN ID, if you are using a VLAN.
Add subnet to NAD
Now we will edit the newly created NAD to include a subnet for automatic IP assignment to the virt-handler pods in the openshift-cnv namespace by following these steps (Figure 3):
In the OpenShift web console, select Networking → NetworkAttachmentDefinition.
Select the openshift-cnv project from the Project list.
Click the newly created NAD nad-live-migrate.
Click YAML.
Edit the JSON config and add the required subnet to it. To avoid any errors, remember to format the JSON correctly.

The following is the combined YAML definition of the NAD:
apiVersion: k8s.cni.cncf.io/v1
kind: NetworkAttachmentDefinition
metadata:
  name: nad-live-migrate
  namespace: openshift-cnv
spec:
  config: |-
    {
        "cniVersion": "0.4.0",
        "name": "ovs-lm",
        "type": "ovn-k8s-cni-overlay",
        "netAttachDefName": "openshift-cnv/nad-live-migrate",
        "topology": "localnet",
        "vlanID": 3030,
        "subnets": "192.168.100.0/24",
        "excludeSubnets": "192.168.100.0/30"
    }
Update the OpenShift Virtualization configuration
Let's update the OpenShift Virtualization configuration to use the newly-created NAD. Refer to Figure 4 which illustrates the following steps:
As a cluster admin, navigate to Virtualization → Overview on the left side of OpenShift web console.
Click Settings → General Settings → Live Migration.
Select nad-live-migrate from the live migration network list.

You can also do this using the command-line interface (CLI) as follows:
oc patch HyperConverged kubevirt-hyperconverged -n openshift-cnv --type=merge -p '{"spec":{"liveMigrationConfig":{"network":"nad-live-migrate"}}}'Key points to note:
HyperConverged: custom resource (CR)Kubevirt-hyperconverged: This is the name of the custom resource. Make sure you target the correct name. You may list the CR using the command:oc get HyperConverged -n openshift-cnv.openshift-cnv: This is the namespace.nad-live-migrate: This is the NAD we created earlier.
Monitor the change
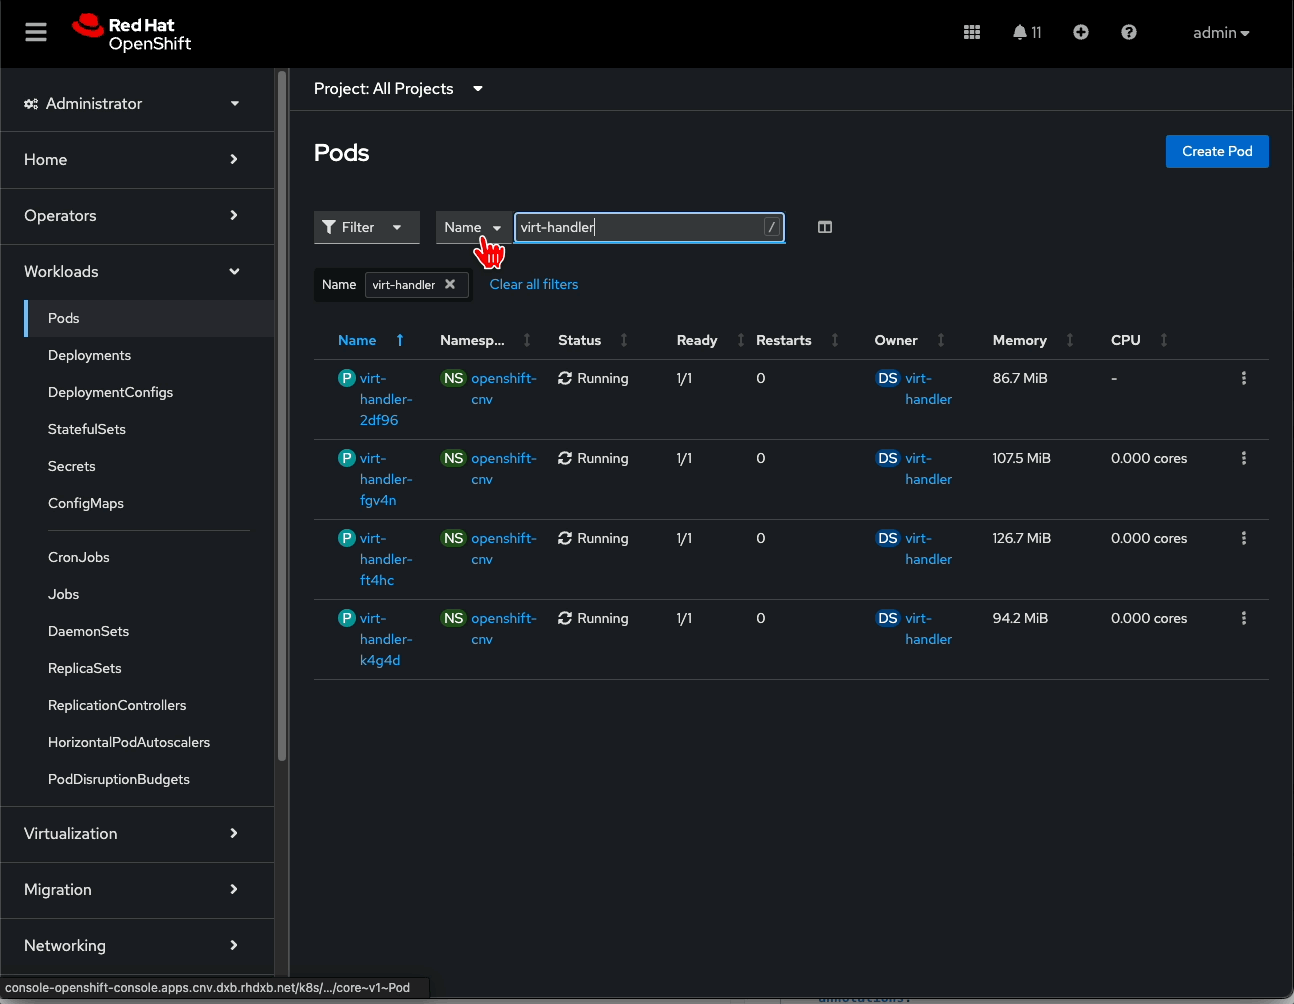
At this point, you are almost ready for live migration on the secondary network. However, before you attempt a migration, it would be good to check if the virt-handler pods in the openshift-cnv namespace have all restarted and they're in good status.
The cluster has four bare metal nodes. Hence, you will find four virt-handler pods, each running on one of those nodes. Make sure they are all in the running state and the ready status is showing 1/1. Also make sure that all of them recently restarted by checking their creation time, as shown in Figure 5.
Test the migration
Once you have made sure the virt-handler pods are running and in healthy state, you can run a test the live migration of a VM. For example, Figure 6 depicts live-migrating a virtual machine called fedora-01.
To run the live migration, follow these steps:
Select Virtualization → VirtualMachines from the left side navigation menu.
Click the three dots (kebab) on the right side of the virtual machine that needs to be migrated (e.g., fedora-01).
Click Migrate to initiate the live migration process. In a few seconds, the virtual machine should be migrated from its existing host to a different host in the cluster.

You can also check if the VMI has the targetNodeAddress from the new live migration network as follows:
$ oc get vmi fedora-01 -o json | jq '.status.migrationState | {targetNode, targetNodeAddress, targetPod}'
{
  "targetNode": "master-2",
  "targetNodeAddress": "192.168.100.15",
  "targetPod": "virt-launcher-fedora-01-7gr8p"
}
As you can see, it shows the IP address from the pool of IP addresses assigned to the NAD and on which node it belongs.
Final thoughts
By setting up a dedicated network for live migration, you can see how OpenShift Virtualization supports real-world enterprise needs. It is built to handle your important applications in a way that is powerful and easy to manage. Give OpenShift Virtualization a try and see how it can help you run your virtual machines with speed and confidence. Check out the Red Hat OpenShift Container Platform documentation, Configuring a dedicated network for live migration.
